While working on the texture mapping for my Blending Life model, I kept getting inconsistent results using a bump map to create the skin relief texture. In this context a bump map is a grayscale image texture mapped to the Nor channel, creating an impression of relief on the surface, based on level of gray in the image determining the perceived height of the surface above an average “un-bumped” surface. Dark to black on the image is a “pit” and light to white is a “bump.”
As the image shows, the bump effect (left side) is not applied evenly over the entire surface of the model, some patches seem completely unaffected. The image texture shown was continuous over the entire image area, and was UV-mapped to the model.
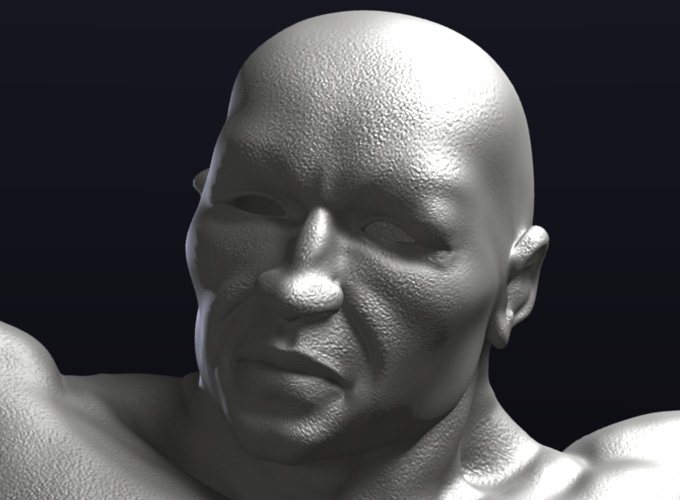
To find out if it’s the model or the way Blender does bump-mapping, I used the grayscale bump image texture to generate a tangent-space normal map in Xnormal, and applied it to the model in the same fashion as the bump image, the only difference being that the “NormalMap>Tangent space” option was enabled in the Map Image pane of the Texture context. As can be seen there is no inconsistency in the surface effect, except a nearly unnoticeable fall-off at the extreme edge of the model surfaces. Obviously I prefer this even application of the effect over the bump map’s patchiness.
But I don’t recall ever seeing anything like this with bump maps before – I’m now using 2.46 official release , but as recently as 2.45 the bump mapping on my other models looked fine, or a least was completely unnoticeable. Has anyone else noticed this problem with bump maps in versions 2.46 or later?
on the bump, it’s because of the light. the light is washing out the “shadows” that would otherwise be created by the bumps. This is more realistic. By his nose, the light is not direct, so there is no hard shadow, and no bumps are visible.
Not sure if lighting direction is the cause, PapaSmurf – here’s the exact same setup from a different camera angle, and all the bump along the side of the face has vanished – same lighting, it should be visible. Looks to me like the effects seems highly dependent on viewing angle, with the bump vanishing as the angle gets more acute.
@ Cyborg Dragon – thanks for the info, I wasn’t aware bump was an issue with Blender, but it does seem to have its problems. Converting all surface texturing to normal maps will be more complex but it seems the way to go for overall consistency.
For whatever material settings and light rig you are using, yes, as the camera angle changes, the whole light thing changes with bump mapping. as the plane or angle of the mesh gets perpendicular to the camera, the bumps become less noticiable. It’s almost like you are using side fill lights, like hemis, that are giving the sides a very perfect even light that is washing out the bumps. The degree to which you see the bumps depends on your material ambient, the diffuse, spec, and Nor, and side lights. Try killing the lights and going back to one. When I light a sphere with a marble bump and a strong key and a red spec, I can see bumps all over. If I reduce the spec and fill with a hemi, I get side washout.
Also, for realism, the bump Nor is too strong anyway; almost looks like beading sweat.
Nope, nothing complicated, just a default material with the bump added (keeps the variables down) and only got one key light, a large area, illuminating the one side, and on the opposite side a low-energy hemi kicker that doesn’t influence the fully lit side at all. Bump was exaggerated for the test, thought that’d be obvious, unless I was tryin’ to do Sandman or sumpthin’. Actual skin-texture would be too subtle to see the effects as clearly. I was also using a constant-sized noise pattern to help gauge the edits I did to the default unwrap to make sure the texture stretching was as minimized as possible. UV grids are OK but don’t tell the whole story.
I’ll try some other lighting arrangements, see if the fade-out persists. But not with a sphere, cause that’s not the model I’m working with. Shouldn’t be any diff anyway.