


How to use Lightroom Profiles (vs Presets) in 2024
How to use Lightroom Profiles (vs Presets) in 2024
Lightroom | Software | By Brenda Bergreen
Shotkit may earn a commission on affiliate links. Learn more.
Let’s walk through Lightroom profiles, including what they are, how they are different from presets, and how to use them.
Having a solid editing workflow can make your job easier since editing is a big part of what photographers do.
Additionally, using presets and profiles can help you solidify your editing style so that you have a cohesive portfolio and editing style.
Taking a raw image from start to finish in Lightroom Classic is now even easier with Lightroom Profiles.
Popular course reveals the simple tricks to getting incredible results with Lightroom in record time. Give Your Photos The Look They Deserve!
![]()
I’ve been using Lightroom to edit my images as a professional photographer for over a decade, and it’s fascinating to think back to the beginning and how far Adobe Lightroom has advanced since then.
It’s gone from basic capabilities to more features than I’m capable of understanding and keeping track of!
Now there are even two versions of Lightroom: Lightroom Classic, Lightroom CC, and even the Lightroom Mobile App that are all great at raw processing.
Hopefully, this article will help you understand profiles and presets just a little better so that you can enhance your editing workflow.
How to Use Lightroom Profiles: A Basic Understanding
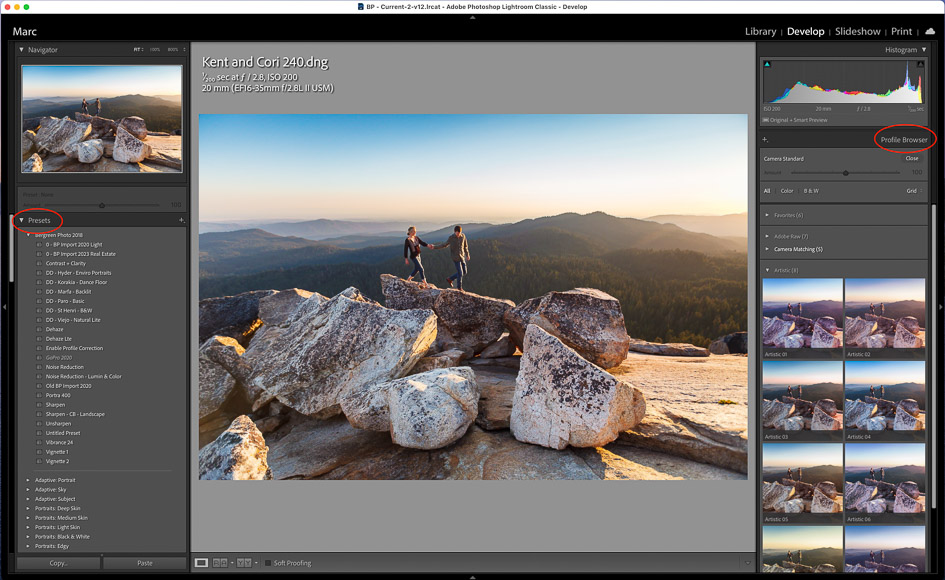
On the left side are the standard presets. On the right you’ll see the profile browser.
Adobe Lightroom profiles are kind of like Lightroom presets but they’re also completely different. I know, it’s confusing.
I’m going to try to break it down for you by walking through presets and profiles and how we can use them to take raw files from start to finish.
Essentially, Lightroom profiles give you more ways to modify your images and customize your workflow so that you have more ways to find the perfect color balance in a raw image.
Adobe Color Profiles
Let’s start with remembering color profiles and RGB curves, sorry in advance for the art class flashbacks.
I’m not by any means an expert on this but I’m going to try to explain it well enough that you can understand what you need to understand for the sake of this article.
You might recall that your camera offers a choice of profiles and typically we use Adobe RGB or sRGB. This can be found in the menu system of your camera.
Image printers will have a certain color profile that they utilize and your paper choice can also impact how colors appear.
Our visual color field is different than what can be reproduced on screens, paper, and on websites. These all form overlapping areas of a visible color spectrum but don’t have the same boundaries.
When working in Lightroom, you’ll be working in ProPhoto RGB. Luckily, ProPhoto RGB is able to see all the colors digital cameras can create. That changes when you export your images to jpg.
The reality here is that if you’re editing images for print, you may want to export in a larger color space like Adobe RGB so that you’ll get a closer look to your printed image.
If you’re working primarily for web use, you will want to export in sRGB because that is the color space used on the internet.
All this is important because when you use powerful editing software like Lightroom, you want the exported result to match the look you’ve created.
Additionally, you will want to make sure you’re working with a color-accurate monitor that has been calibrated. If you don’t have access to these tools, I recommend looking at your images on a variety of different screens to at least get a sense of inaccuracies you might be unaware of.
If you’re with me so far we can move on to what this all has to do with presets and profiles.
Lightroom Presets
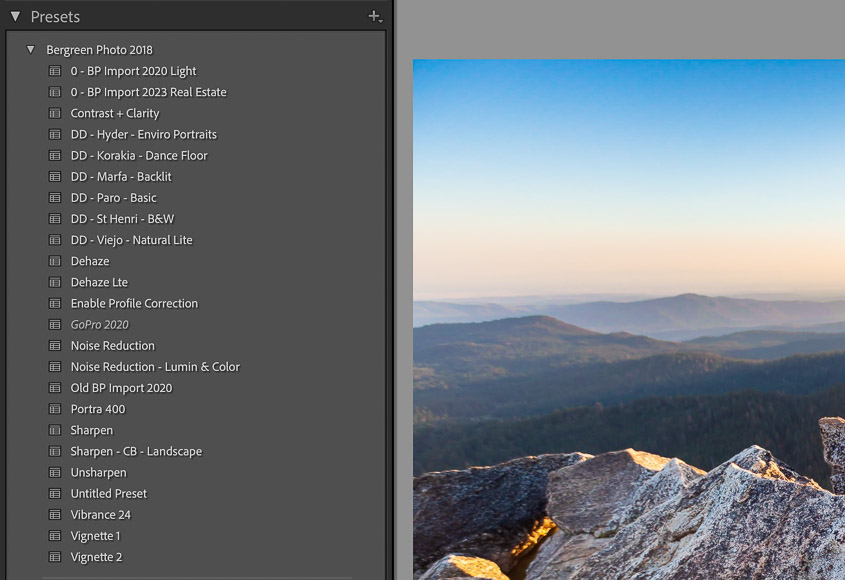
Presets are the classic way to get a quickly edit an image.Think about all the editing adjustments that you make to a raw file.
If you always adjust certain sliders on every image, you might have basic panel presets that you use as part of your editing workflow to make general minor adjustments to all of your photos.
You might utilize certain presets to create adjustments for certain types of photos and other presets for other adjustments. Presets can be additive and stack on top of each other as long as they don’t change the exact same parameters.
Typical presets I use have settings for: basic panel adjustment, tone curve adjustments, lens corrections, sharpening/detail, and noise reduction. You can also have presets for things like gradient maps that can create effects like a vignette in a more custom way.
You might even utilize import presets where you apply metadata or develop settings upon import.
Presets are a great way to speed up your workflow and gain consistency in your editing whether you’re making minor adjustments to all of your photos or using them more heavily in your editing.
Lightroom Profiles: Beyond Lightroom Presets
Sometimes you need to go beyond the control capabilities of Adobe Lightroom presets.
This brings us to profiles in Lightroom. At first glance, profiles and presets seem or sound very similar since they appear to be editing adjustments.
Profiles are a step beyond presets, or maybe a step on top of them? Essentially you can apply a profile on top of your adjustments without impacting those adjustments.
Or you can use profiles as a starting point to give all your images a similar look/feel.
You might be more familiar with the term camera profiles and remember that your camera has internal color profiles. These often use terms like: vivid, landscape, monochrome, etc.
If you opt for a jpg file type instead of camera raw and use a black-and-white camera profile your jpg would have that color profile applied to it. The camera profile gets “baked in” to the jpg and the edits cannot be reversed.
Instead, photographers can now shoot in camera raw and then apply non-destructive color profiles to their files using Lightroom profiles from the develop module.
These will now look like the jpg color profiles available in the camera but you can easily flip between profiles to choose the look you like after the shoot.
Usually, or historically, we’re simply applying the default Color profile available in adobe camera raw.
But if you look through the profile dropdown for color profiles in Lightroom, you’ll see more color profiles as well as camera-matching color profiles associated with the type of camera you shoot.
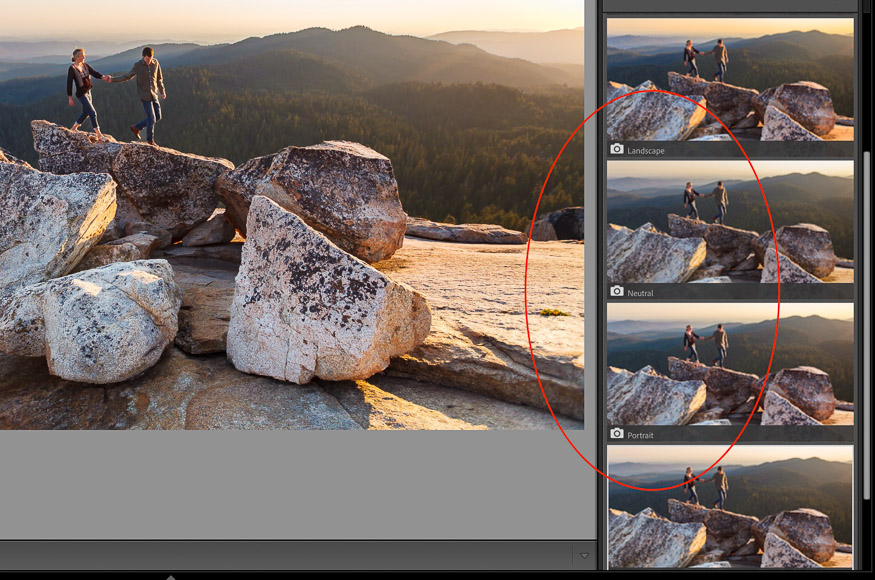
These are the camera specific profiles available in Lightroom (specific to your camera).
Then, you’ll see more Lightroom profile options as well as any creative profiles that come natively installed. Additionally, there are profiles created and sold on the internet if you have a more custom look in mind.
Profiles impact color tonality, contrast levels, and whether an image is black-and-white or color. They can often have a look similar to film (i.e. kodochrome) or even match a Hollywood style.
Using Lightroom Profiles and the Profile Brower
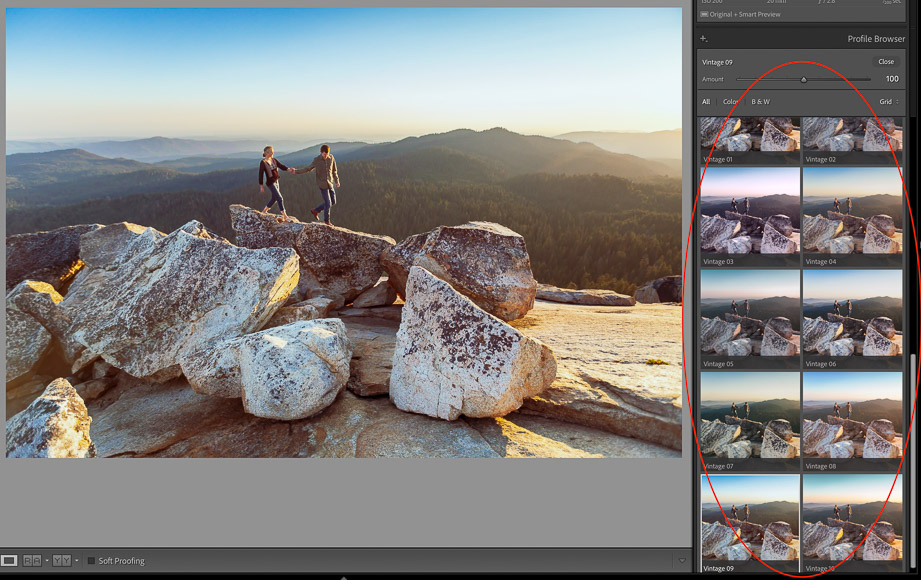
Creative Lightroom Profiles can create custom artistic looks.
Similarly to your preset menu on the left side of your Lightroom screen, you have a profile browser on the right.
Go into Lightroom and in the Develop Module, you’ll see Profile: Adobe Color or another Adobe default profile.
In the profile browser, you can start by browsing options and viewing the Lightroom profile options that are already installed.
You can apply the profile, easily switch between different profiles, and you can even preview how the image looks without applying the profile by hovering over the various options in a grid view.
From there you can fine-tune the amount slider. Note that the amount slider doesn’t work on standard camera profiles.
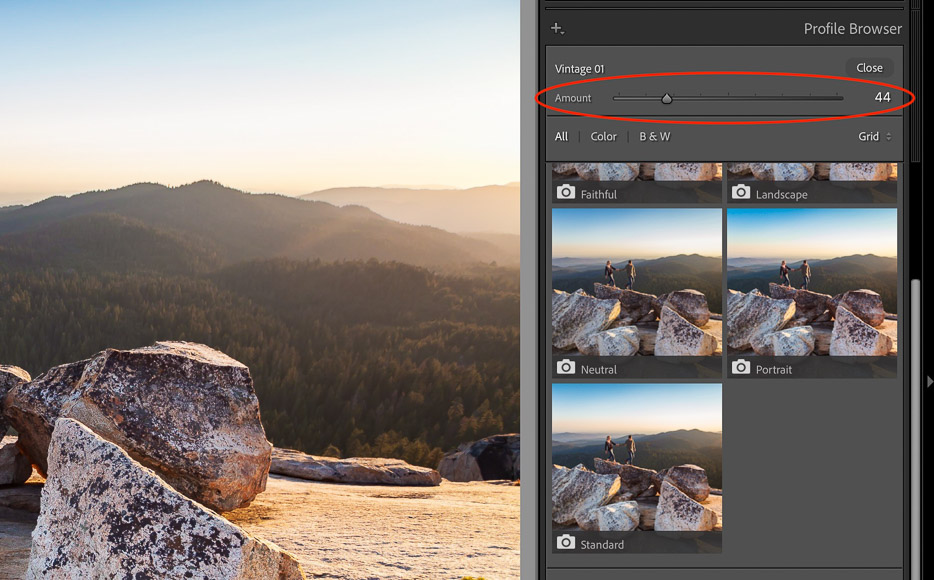
Turn down the amount slider to reduce the affect of the profile.
You can easily switch to a different profile at any point in the editing process without affecting the other slider settings.
Creative profiles, however, do allow you to make further adjustments.
Creative profile developers have collections of profiles that you can utilize and install into your profile browser but they are a bit of a black box since you won’t be able to see what settings have been adjusted like presets.
I think that one way to use lightroom profiles is to see them as a custom starting point for deciding how to stylize your image.
If you edited all of your photos, perhaps with your Lightroom presets, you could then apply a profile on top which wouldn’t impact your edits but could give them all a cohesive style.
The way I like to think about it is that each profile is a starting point for tweaking your images and developing your style beyond the capability of Lightroom presets.
Using Lightroom presets and profiles can increase your efficiency but beware of relying on them too much.
For example, when I look back at an image that I edited when I first discovered the power of the preset it’s embarrassing. My editing style was all over the spectrum with no consistency.
If you’re relying on copying a preset from another photographer in hopes that their success will bleed over to you, you’ll need to look at making other adjustments (and I’m not talking about your preset.)
Use profiles and presets to learn, grow, and be creative. Let them spark interest in what is possible in Lightroom, then find what works for you. When in doubt, keep your editing mild.
Everyone knows someone who is a little too aggressive with their post production and it’s usually best to use your tools in moderation.
How to create your own Lightroom preset
As I described above, many photographers utilize presets to apply a batch of edits across photos, luckily it’s easy to create your own Lightroom presets.
To create your own Lightroom preset, go to the Develop Module.
From there, on the left side, there is a plus sign next to Presets. Click it.
Click Create Preset and then select and adjust the desired settings, rename, and click create.
Now that you’ve created your new preset, you can create other presets with just a few clicks!
I suggest thinking through an organizational system so that you can easily find and use your presets.
How to Install Lightroom Mobile Presets
How to add a profile to Lightroom
From the menu choose File and Import Profiles and Presets.
Select the profile you want to import and click import.
You’ll now have access to the Profile and can add them to the favorites category by hovering and clicking the star.
Lightroom profiles vs presets (What’s the difference between presets and profiles in Lightroom?)
Lightroom Presets are a set of adjustments that you can apply to your photos with just one click, or upon import.
They are essentially a saved set of edits that can include changes to exposure, contrast, saturation and other settings. Presets can be created by you or downloaded elsewhere. When you apply a preset to a photo, all the adjustments included in the preset are applied to the photo at once.
Lightroom Profiles are a set of instructions that define the color and tone of your photos, much like a ‘LUT’. LUTs or look up tables are not as complex as presets and only affect the color and tone of the photo.
Profiles work by adjusting the colors and tones of the photo’s highlights, shadows, and mid-tones based on the input and output color spaces. They can be used to achieve a specific look or to correct color issues.
Lightroom Profiles | Conclusion
Hopefully this has helped give a good understanding of the new feature of Lightroom Profiles.
As editing continues to get more creative options and complexity to the menu system, it’s nice to have tools like Profiles to have simple adjustments to make your images shine.
With Presets and Profiles it has never been easier to create a unique and cohesive editing style.
While various Lightroom alternatives offer presets, profiles on the other hand are unique to Adobe Lightroom.
I hope that next time you restart Lightroom you’re able to find the creative tools to transform an image to match your vision!


Brenda Bergreen is a photographer, videographer, writer, and storyteller based in Colorado. She specializes in Colorado wedding photography and adventurous storytelling. When she’s not behind the camera or the keyboard, you can find her adventuring with her family.
👋 WELCOME TO SHOTKIT!

🔥 Popular NOW:
