
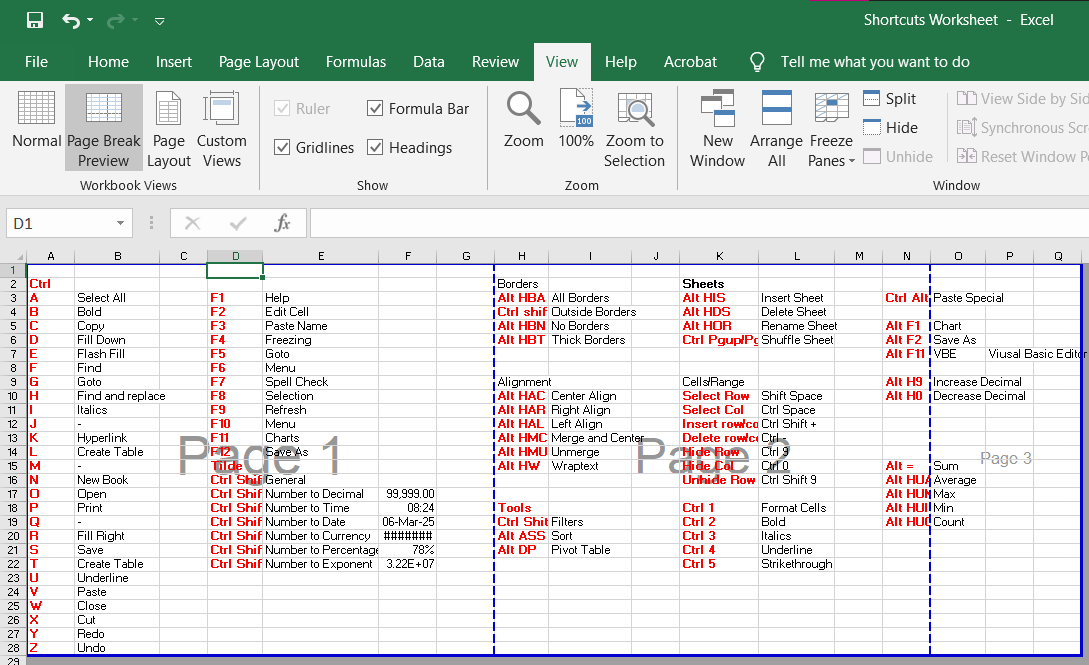
Page Break Preview
Page Break view is a very useful tool when determining the boundaries of the workbook to be printed. It gives an all page miniature view, so that you can easily visualize how your prints going to look.
It also gives you a possibility to customize and optimize tables to the size and orientation of paper sheets.
If you find something odd you can always fix the boundaries, insert manual page breaks (which we have discussed in our previous post) and change the size of elements like tables to fit within the page.
Viewing Page Break Pre-view
To enter the mode for managing the page breaks.
Go to View tab -> Under the workbook views section -> Select Page Break View tool.

After clicking you’ll now see the Page Break View which looks like this:
Here you can clearly see and understand the start and end of a page and edit the pages accordingly to fit into a single page.
The dashed lines are automatic page breaks while the solid line is the manual page break.
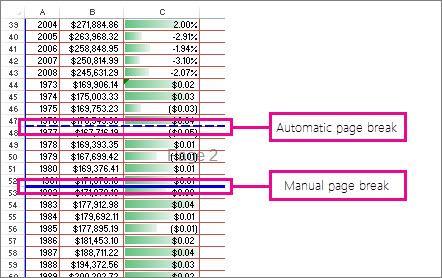
You can set manual page break by hovering over the automatic page break dashed line and dragging the page break to a position where you want.
Set Orientation of Excel Sheet
By default, Microsoft Excel prints worksheets in portrait orientation (taller than wide). You can change the page orientation to landscape on a worksheet-by-worksheet basis.
Change the page orientation
- Select the worksheet or worksheets for which you want to change the orientation.
Tip: When multiple worksheets are selected, [Group] appears in the title bar at the top of the worksheet. To cancel a selection of multiple worksheets in a workbook, click any unselected worksheet. If no unselected sheet is visible, right-click the tab of a selected sheet, and then click Ungroup Sheets.
- On the Page Layout tab, in the Page Setup group, click Orientation, and then click Portrait or Landscape.

Notes:
- If you don’t have a printer set up, the Orientation option will appear dimmed, and you won’t be able to select it. To resolve this, you must set up a printer. The option also appears dimmed when you’re editing the contents of a cell. To resolve this, press Enter to accept the changes or Esc to cancel the changes.
- Because you can set page orientation on a worksheet-by-worksheet basis, you might print some worksheets in a workbook in one orientation (such as portrait orientation) and other worksheets in the same workbook in the opposite orientation (such as landscape orientation). Simply set the orientation for each worksheet as appropriate, and then Print a worksheet or workbook.
Change the page orientation when you are ready to print
- Select the worksheet, worksheets, or worksheet data that you want to print.
- Click File > Print.
- In the Page Orientation drop-down box, under Settings, click Portrait Orientation or Landscape Orientation.
- When you are ready to print, click Print.
Remove Whitespaces in a cell
How to remove spaces within a text/number in a cell or remove trailing or leading whitespaces?
To remove extra spaces in a text field
We will use a helper column to first trim out the text and then copy the column to the original column and save the changes.
- Choose a helper column to work with
- Apply the formula =TRIM(cell_no) to the helper column
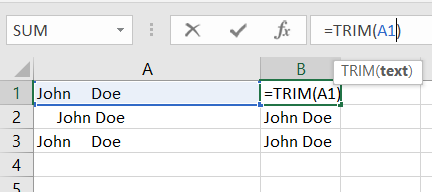
- Copy the formula down the cells to the desired number
- Select the helper column and paste to the original column

To do this:
- First select the contents from the helper column and copy (CTRL+C)
- Select the cells in the original column to be replaced.
- Right click on the new selection
- Click on the paste values (icon with 123 written on it) icon.
- Delete the Helper Column
Voila! You now have removed the spaces.
Let us now Remove extra spaces from numbers

The easiest way to get rid of excess spaces is using the standard Excel Find & Replace option:
- Press Ctrl + Space to select all cells in a column.
- Then, press Ctrl + H to open the “Find & Replace” dialog box.
- Press Space bar in the Find What field and make sure the “Replace with” field is empty.
- Click on the “Replace all” button, and then press Ok.

Voila! All spaces are removed.
Sources: