- Handcrafted
- Season 1
- Episode 14
How A Master Chocolatier Makes 5 Gourmet Chocolates
Released on 10/25/2022
[Michael] I'm Michael Asconis, the creative director
at New York City's Institute of Culinary Education.
I'm gonna transform these ingredients
into a box of five chocolate bonbons.
I had always envisioned
arriving into the New York food scene
at maybe the one or two star level.
I didn't think I was gonna arrive at the four star level.
So being the pastry chef at a legacy restaurant
like Le Bernadin carries with it a ton of pressure,
but I knew this was my dream,
and I ended up staying for eight years.
The first bonbon I'm gonna make today
is a white peach melba bonbon.
I love the idea of taking a classic
and distilling it into a single bite.
I'm taking colored cocoa butter
to create a very basic spackle effect.
The red cocoa butter that I'm using here
is simply pure cocoa butter
that's been pressed from cocoa beans.
I'll need some tempered white chocolate.
White chocolate is comprised of cocoa butter, sugar,
milk powder and typically some vanilla for flavoring.
I'm adding just enough of this red colored cocoa butter
to evoke the white peach.
I'm gonna transfer my tempered white chocolate
into a pastry bag.
I'm gonna tap the mold,
just to make sure that the chocolate
is fully coating the inside of the cavity,
and to dislodge any air bubbles that might be trapped,
and then I invert the mold to remove excess chocolate,
which will leave me with the thinnest possible shell.
And really, that's the mark of any great chocolatier,
is that contrast between a perfect, thin, brittle shell
and the soft fillings that we put inside of it.
This is a mixture of raspberry puree,
pectin, a substance that's found in virtually all plants,
the glue that holds cell walls together.
Even though there is natural pectin in the raspberry,
I'm adding additional pectin
to give us just the right consistency.
In addition to sugar, I'm using glucose.
Glucose is derived from starch.
It's also known as corn syrup.
It will lower the overall sweetness,
and it will prevent this gel from crystallizing over time.
And a little bit of citric acid.
So this raspberry gel is very similar
to a very popular confection known as pate de fruit.
Translated from French, it simply means fruit paste.
Now that my raspberry gel has cooled,
I'm gonna transfer the raspberry gel to a pastry bag
and apply a small dot into each cavity.
And next, I'm going to prepare the peach ganache.
Instead of using heavy cream as my liquid,
I'm actually using white peach puree.
And we're using invert sugar and glucose syrup
brought to a boil, and then I'm gonna gently incorporate it
into my white chocolate.
Mixing very rapidly and thoroughly
to create a perfect emulsion.
I'm observing the chocolate, how it behaves, its appearance,
and I'm looking for a slight elasticity.
I can even see by the way the ganache is pouring
out of the bowl into the pastry bag
that I've achieved the perfect texture.
I wanna leave just enough space,
not only to seal each cavity,
but also to add a textural element.
Once the ganache is allowed to crystallize,
I'll prepare a crunchy almond layer
comprised of untempered white chocolate, almond paste,
and something called feuilletine,
which is crushed up wafer cookies.
The fat in the white chocolate coats these tiny wafers
and will keep them crisp inside the bonbon.
I'm gonna transfer this mixture
between two pieces of parchment paper
and roll it out as thin as possible.
I'm gonna let this chill to set,
and then I'll cut it into small discs
just the size of the bonbon.
And I still have a millimeter or two of space
that will allow me to seal the bottom of the bonbons
with some of my tempered chocolate.
This can take anywhere from an hour to several hours
to finish that crystallization.
Properly tempered cocoa butter actually contracts
as it turns from a liquid to a solid,
otherwise chocolate would never pop out of the mold.
My white peach melba is done,
and next I'll make a classic palet d'or ganache.
So a ganache at its most basic is chocolate and liquid.
Most of the time, that liquid is heavy cream.
Invert sugar is made from regular sugar.
It's a perfect addition for texture enhancement
and shelf life in a ganache.
So really, my approach with something so classic
as a palet d'or is to highlight the quality of the chocolate
that I'm using, and I want to prepare that ganache
in a way that allows the subtle flavors of those chocolates
to really shine through.
I'm going to bring this up to a boil
and then I'm gonna slowly, gently incorporate it
into the dark and milk chocolate,
in order to create a perfect emulsion.
I define an emulsion as being a stable mixture
of two things that don't typically like to be mixed
with each other.
In this case, the fat and the cocoa butter,
as well as the water that comes with the heavy cream.
And based on the style of bonbon that we're creating,
the consistency of that ganache is completely dependent
on that ratio of liquid to chocolate,
so it could be sliceable or it could be soft enough
to fill a molded chocolate shell.
Once I've incorporated all the cream,
I want that ganache to cool to about 95 degrees Fahrenheit
before adding the butter.
Temperature is crucial,
and I wanna make sure I don't actually melt the butter,
but rather I'm creaming that butter in,
and that will give me the perfect texture.
It should be smooth, creamy, glossy.
It might even have a slightly elastic texture.
And then I'm gonna let this crystallize
several hours or overnight.
So now I'm applying this foot, or as the French would say,
[Michael speaks French].
A very thin layer of untempered chocolate
onto a piece of acetate,
and then transferring the crystallized frame of ganache
on top of it.
And I'm using untempered chocolate in this case
because I don't want this chocolate to set as firmly,
so I have a nice clean cut
when the ganache is cut on the guitar.
I realize that a lot of pastry chefs
probably think they know more about chocolate
than they actually do.
So for most of my pastry chef career,
chocolate was just the ambiguous ingredient
that's always there on the shelf.
Tempering,
or what I sometimes refer to as pre-crystallizing chocolate,
is really important for fine chocolate work.
I wanna make sure
that that chocolate is taken over 40 degrees celsius,
and this ensures that all of the existing crystals
in that chocolate have fully melted.
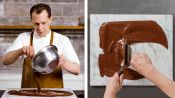
Tempering chocolate on a marble slab
allows me to be up close and personal with the chocolate.
Sometimes I don't even use a thermometer.
I can just tell by the feel of things.
The first few times I tried to temper chocolate,
it was a disaster.
But with an understanding
of what's happening in the chocolate
and constant repetition and practice,
it's easy to become a tempering master.
Now that the chocolate has cooled,
I then reintroduce it back into the chocolate
that is still warm,
and that will effectively raise the temperature
of that cooled chocolate to a working temperature
of about 88 to 90 degrees.
So when we talk about liquid fats turning into a solid,
we often use the word crystallize,
and cocoa butter can turn from a liquid to a solid
in about six different crystal formations.
Only one of those will give us shine, snap,
a resistance to melting.
I will take a test, I'll dip a plastic bowl scraper
and allow it a few minutes to crystallize.
If the chocolate is properly tempered, it should set,
it should be glossy, it won't be streaky
and I know I've done my job well.
With any chocolate work, cleanliness is key.
This is the reason I use a blowtorch,
because I don't want water
getting anywhere near my chocolate.
While hand dipping the palet d'or ganache
looks pretty easy and straightforward,
it requires a bit of dexterity
and it's really easy to make a sloppy, over-coated bonbon.
The juxtaposition of pieces of equipment
like an infrared thermometer
and then a cheap wire coat hanger
may seem a bit unconventional.
It was a hack that I learned from another chocolatier
and it's something I've held onto
and worked with ever since.
I'll dip four or five of these pieces
and then apply a piece of gold leaf,
and then press a tiny square of textured acetate
and that will create a distinctive textured pattern
on the finished chocolate.
Next, I'll move on to the hazelnut crunch bar.
I see this as sort of a refined version
of a mass market chocolate bar,
comprised of hazelnut and a crunchy cookie element.
The first step begins with the decoration of the mold.
In the pastry bag,
I have what's referred to as blonde chocolate.
Thinned it out with some cocoa butter, tempered it
and created an abstract pattern into the mold.
Some pastry chefs might refer to this
as roasted white chocolate,
and that roasting intensifies the flavor
and creates almost a dulce de leche like flavor.
I'm gonna fill the remainder of the cavity
with tempered milk chocolate.
I'll let that crystallize
and move on to the hazelnut filling.
Hazelnut praline paste,
comprised of roasted hazelnuts and caramelized sugar,
some melted milk chocolate
and some additional melted cocoa butter.
So cocoa butter comprises about half of a cocoa bean,
and it can be extracted and used on its own.
This is actually a filling I want to temper.
If I were to fill my molds with this mixture as is,
it would be very soft and runny.
By tempering the filling, just like I temper chocolates,
it will allow it to take on a firmer texture
that's actually sliceable.
Before I add my hazelnut filling,
I'm gonna add a textural element
in the form of crunchy crushed sable cookies.
To me, it's texture that makes you wanna keep going back
for another bite.
And then I'll proceed with the hazelnut filling.
If I overfill the molds,
part of the filling will get mixed in with the chocolate,
which will create a mess.
If I under-fill the molds,
then I'll have a very thick chocolate base,
which won't be as pleasant to eat.
I'm going to fill the remainder of the cavity
with tempered dark chocolate.
Once my bars have completely crystallized,
very gently invert and release the bars
onto a small sheet pan.
Next, let's make a classic bourbon truffle.
What's gonna make this ganache a little bit different
from the other ganaches I've prepared
is the ratio of cream to chocolate.
This will be a little bit firmer
than the white peach ganache, for example,
but a little bit softer than the palet d'or ganache,
and that's to facilitate hand rolling the individual pieces.
Once I've properly emulsified the cream into the chocolate,
I'll add the bourbon,
and I'm not cooking out any of the alcohol.
I wanna preserve all of the flavor,
and the alcohol actually also serves
as an additional shelf life extender.
You'd have to consume a lot of chocolate
to feel the effects of the alcohol.
I let this ganache completely crystallize in the bowl
from several hours to overnight.
I transfer it to a pastry bag
fitted with a plain pastry tip.
I'm holding that pastry bag about a half an inch
from the surface of the paper.
That effectively allows me to create a spherical shape
that gives me a great place to work from.
So I'll pop that in the refrigerator just for a few minutes,
making it a little bit easier to handle.
I'm wearing gloves here just to keep my hands clean,
but also to insulate the heat from my hands somewhat,
just enough to get a smooth shape
without actually melting the ganache.
Now it's time to hand dip into the tempered dark chocolate.
And then using a circular chocolate dipping fork,
I'll manipulate the truffles into the chocolate
to evenly coat, and then drop them onto a pan
of sifted cocoa powder.
The cocoa powder I'm using is what we call Dutch process.
It's been treated with an alkaline.
This will give us darker color, a richer aroma.
I'm paying some attention
to the thickness of the shell here.
I don't want too much chocolate around the outside,
creating too hard of a shell.
I'll pause for a few moments to allow that chocolate to set,
and then I'll transfer the truffles to a sift
before displaying and eating.
So in tasting a chocolate truffle,
your palate goes through an evolution of senses.
The aroma of the bourbon,
the strong bitterness of the cocoa powder,
the subtle crunch of the shell,
which then reveals the soft ganache interior.
Next, let's make a chocolate nougat.
It's not a classic bonbon, per se,
but a classic confection that utilizes chocolate
in a novel way.
So traditional nougat begins with cooking a sugar syrup
and incorporating that syrup into cooked egg whites.
I need to ensure that this syrup has cooked
to a degree where most of the water has been removed,
and thus I'm using a thermometer to gauge
both the temperature and the moisture content of the syrup.
Classic nougat flavored with honey, toasted nuts,
and perhaps some fruit element
often evokes the French Riviera.
The egg whites used in a classic nougat recipe
both serve as a whipping agent that help incorporate air
and the protein in the egg white
lends just a certain texture
to the finished product as well.
There's a little bit of time pressure when preparing nougat.
I need to produce a cooked sugar syrup
while also boiling honey,
so attention to detail and proper sequence is crucial.
I'll use a blowtorch to heat up the side of the bowl,
which will remove additional water from the mixture,
and as I heat the side of the bowl,
I can see the nougat mixture
start to pull away from the side of the bowl,
and that's when I know I've reached the right consistency.
Up to this point,
I've put so much care and precision into this.
Now I'm just gonna dump in everything else.
So first, the chocolate, followed by the almonds,
the hazelnuts, the pistachio
and finally the candied orange peel.
At this point, the nougat still might appear very soft,
but it's important to remember that it's also very hot.
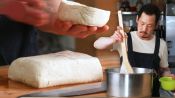
Then I'm gonna transfer my nougat mixture
to a silicone baking mat
and actually use the mat to hand knead the mixture
to finish the mixing process.
As this nougat cools,
the chocolate in the nougat will also cool,
and that cocoa butter will add a little bit of solidity.
I'm using the caramel bars, a second silicone mat
and a rolling pin to fashion the nougat
into a rough rectangle that I can use to cut later.
After it sets for several hours,
I can remove the silicone baking mats,
and using a serrated knife, very gently cut the nougat
using a sawing motion.
And just like that,
we've created five different chocolate confections.
Bonbon literally translates to good good,
and I think chocolate is good, so I think it's appropriate.
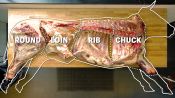
How To Butcher An Entire Cow - Every Cut Of Meat Explained

How to Butcher an Entire Pig - Every Cut of Pork Explained
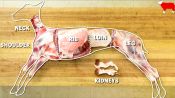
How to Butcher an Entire Lamb - Every Cut of Meat Explained
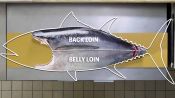
How To Butcher a Whole Tuna: Every Cut of Fish Explained

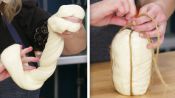
How to Make Handmade Soba Noodles
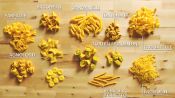
How to Make 29 Handmade Pasta Shapes With 4 Types of Dough
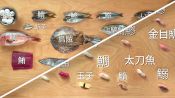
How to Make 12 Types of Sushi with 11 Different Fish
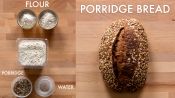
How to Make 3 Kinds of Bread from 1 Sourdough Starter
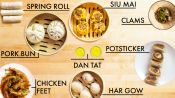
How To Make 8 Types Of Dim Sum
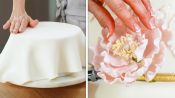
How a Sugar Artist Crafts a 5-Tier Wedding Cake
How To Make 13 Artisanal Italian Cheeses | Handcrafted
How To Make Japanese Candy (8 Types Of Wagashi)
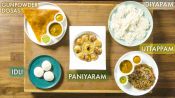
How an Indian Master Chef Makes Dosas, Idli & More
How A Master Chocolatier Makes 5 Gourmet Chocolates
How Traditional Korean Tofu is Made
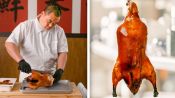
How A Master Carver Makes Peking Duck (40 Hours)
How To Make 3 Kinds Of Boba Milk
How a Japanese Chef Turns a Whole Fish Into 6 Dishes