
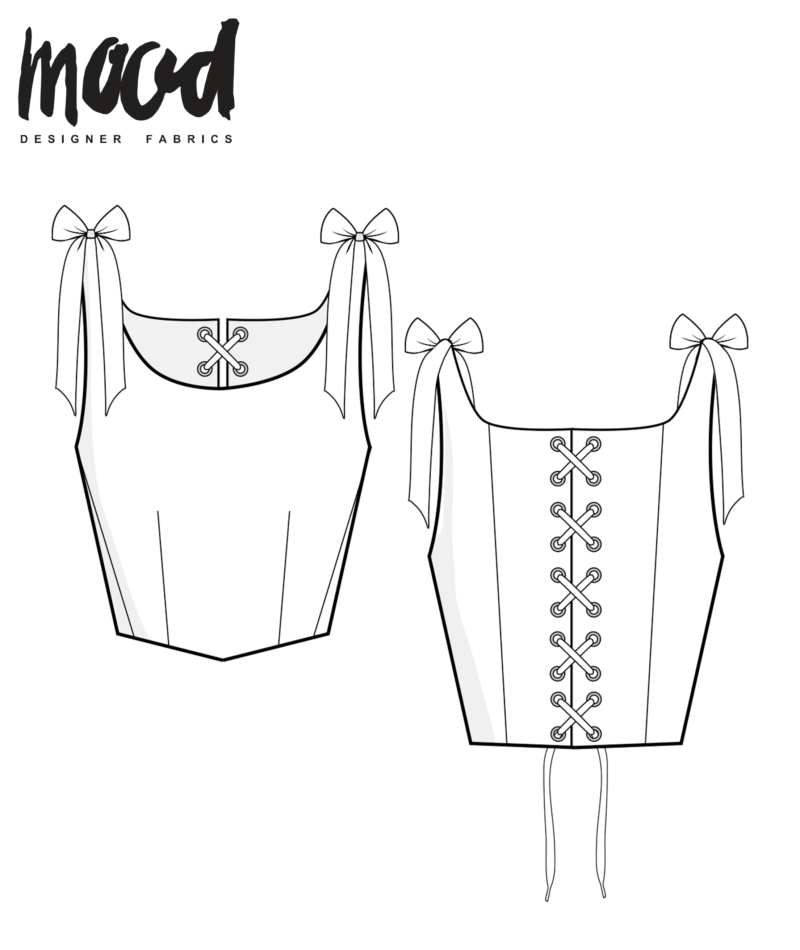
Lace-up bodice tops, corsets, stays – whatever you call them, they’re a trend that’s here to stay for another season. These easy corset tops are absolutely everywhere this season, being thrown on over casual day dresses and dress shirts alike. The Spearmint Corset is the perfect free sewing pattern for jumping into this trend and it can be made with a variety of fabrics! Try an elegant brocade to elevate the look or opt for a simple corduroy or cotton print for a more cottagecore vibe. Personally, I love that the pattern is designed to fit onto Mood’s large-scale embroidered patches, which were used in the samples shown!


Alternative Recommended Fabrics:
Purchase Materials Used Below:
Maroon Skull Version:
- 1 pc French Multicolored Diamonds and Bandanas Oversized Square Patch – 18.875″
- 1 yard Stratton Maroon Solid Organic Cotton Twill
- 2 pkg Dritz Antique Brass Grommets Size 3/8 – 8ct
- 4 pcs Weathered Gold Rounded Square Metal Ring – 35mm
- 2 yds Fuchsia Double Face French Satin Ribbon – 1″
- If also using to lace-up back of the corset, add 3 yards.
- MDF310 – The Spearmint Corset Sewing Pattern (free download below!)
Green Tiger Version:
- 1 pc French Khaki and Olive Bengal Tiger Chief Oversized Square Patch – 18.875″
- 1 yard Stratton Olive Solid Organic Cotton Twill
- 2 pkg Dritz Nickel Grommets Size 3/8″ – 8ct
- 4 pcs Silver Rounded Square Metal Ring – 35mm
- 2 yds Hunter Double Face French Satin Ribbon – 1″
- If also using to lace-up back of the corset, add 3 yards.
- MDF310 – The Spearmint Corset Sewing Pattern (free download below!)

Note: This pattern calls for bias-bound edges. I recommend making some bias tape with your corset fabric following this tutorial, or grabbing some premade bias tape to match!
1. Once your pattern is cut out, mark and sew your darts along the front bodice using a 1/2″ seam allowance. Press the darts toward the side seams.
2. Repeat with your lining layer.

3. Attach your side front panels to the center front using a 1/2″ seam allowance.
4. Repeat with the side back and center back panels. Press all seams open.
5. Repeat with your lining layer as well.
Note: For some extra stability, you could add boning along the seams of your lining if desired.

6. Place your main layer and lining layer together with the wrong sides touching. Pin into place at each seam to ensure they’re aligned.
7. Pin and sew bias tape along the top and bottom raw edges, face to face.
8. Double fold your bias tape so the raw edges are tucked inside along the inner edge of your corset and either staystitch in place or stitch-in-the-ditch like below.

9. Add a ring to each strap of your corset, double fold the edge, and stitch to secure.

10. Fold the raw edges of your corset inward at the center back and sew.
11. Add your grommets evenly spaced along both center back edges. (I placed each of mine 1.5″ apart.

11. Connect your shoulder straps with 1/2 yard of ribbon each.
12. Optional: Create some cording to match your corset or use more of the ribbon to lace up the back of your corset.
27 comments
This is the cutest thing ever! I’ve been searching for a pattern like this FOREVER!!! thank youuu
I’ve been looking for a pattern like this that would include my size but not have overly-complex boning…this looks perfect! Thank you!!
Would this be simple pattern to extend in length? Thanks!
Hi Elys! I think so, but just keep in mind that any added length will need to account for the hips. 😀
Thank you very much for this!
Me encantó el patrón, mi corset quedó hermoso, gracias por compartir.
I’ve printed the first page a couple times, and the accuracy square never comes out to 2 inches, even though I’m printing to scale and not changing the scale percentage. I haven’t had this issue with patterns before, so I’m not sure what to do. I’m guessing that means the entire patten is printing a bit smaller, which means measurements will be off. Was this a slight issue with the pattern or is there something I’m doing wrong with printing, even though I’ve not had this issue before?
I put it on 103% and then it’s perfect. Sometimes it’s a printer thing
Is there anyway to modify this pattern so it doesn’t need the ties on the shoulders?
Yes, you can omit the ties and readjust the pattern pieces – lengthen the strap on the front, so it goes over the shoulder and gets sewn into the back bodice. You’d need to make a quick muslin first though, to determine the correct length and seam placement. You could also omit the straps entirely and add adjustable elastic with slides, similar to the straps in a bra. 🙂
estuve buscando un patrón como este y esté sitio web me salvó la vida
Does the pattern include seam allowances?
Yes, all of our patterns have a 1/2″ seam allowance included, unless otherwise stated. 🙂
What would you recommend to do if all of your measurements line up with size 2, but your waist is size 6? thanks! beautiful pattern.
Hi there! We recommend blending between sizes as needed. Mark the size on each measurement point, and then blend between the differing sizes.
Can I add cup to it
Hi Kaviya, we’re sorry for the delay in responding to your question! We get dozens of comments and questions each day, and so many questions get buried and, unfortunately, unanswered. We are now focusing user support on patterns 2 years and newer. We hope this will prevent questions on our more current patterns from going unanswered. Although this is late, we wanted to respond in case anyone else has the same question: While a cup is not necessary for this corset, you can add a cup by measuring the placement of the cups by using your bra and then attach by hand stitching it to the darts on the inside.
Unfortunately this pattern doesn’t seem to be available anymore.
Or maybe there’s a glitch in the system!
Hi Anja,
We’re sorry for the late response! If you’re ever having trouble with downloading a pattern, email info@moodfabrics.com and they’ll send the pattern to you!
hi, my darts are coming out super super pokey.. almsot like bullet bra esc. How should I fix this? sos i love it so much besides that
Hi Beebe! Here are a few tips and common issues:
– When you press your darts, make sure you do so on a tailor’s ham. That will help shape it well.
– Don’t backstitch at the point. Leave your thread tails long, and tie them off.
If it’s still too pointy, I suspect it’s too long for you. I suggest shortening the length of the dart, but keep the same width.
Does this work as a dupe for the Butterick 4669 pattern at all? I’m looking for a similar pattern that goes above a size 20.
Hi Al,
I don’t believe this would be a dupe for the pattern you mentioned; however you could hack this pattern by putting the laces in the front.
Hi! Do you line the entirety of the top/straps with the bias tape?
I’m having trouble knowing whether or not to go through all of the strap to go up until the top.
Hi Marie, we did line the entirety of the top/straps with bias tape!
Hi! I was going to connect the straps but I’m still sensitive about my arms. Would it be possible to add puffy sleeves to it?? Is there be a pattern i could use???
Yes, possibly the sleeves from The Jugflower Dress can fit on this pattern